Showing posts with label Mei's Textile Designs. Show all posts

Saturday, 17 December 2011

The Exhibition

After months of planning and preparation, it was finally happening!

What an event it was at the opening night. Turn out was amazing. Despite the gloomy and rainy weather during the day, the rain cleared by evening. The exhibition looked great and we had lots of compliments and congratulatory emails forwarded to our lecturers. A (very happy and proud) graduate, finally!

The photos below were mostly taken on the day I was rostered to curate the exhibition so it was less crowded. I'd say nearly if not all of us showcased our final project for the year. We could do whatever we wanted so the outcome looks really diverse. I only managed to snap a few people's works. I shall let the photos do the talking :)

Triangles on the wall are the artwork from all of us. 
On the table are our really awesome catalogue booklets

Mara's handprinted lengths, Rachel's plant with a knitted cover and Sarah's plant on the right

 Cassie's handwoven bags

 Teresa A's digitally printed fabrics

 Celina's digitally and hand printed work

 Handmade shoes with woven fabric and pom poms! By Nerida

 Georgie's minimalistic and really versatile designs

 Hannah's beautifully illustrated and hand printed swatches

Hannah's family came over for a visit when we were curating. Her little 4 year old niece, Serena, was soooo adorable and very cheeky! Wouldn't allow me to take a photo of her properly

 Erin's multicoloured fabrics intended for fashion

 One of my favourite work from the exhibition by Marie

Rachel's illustrated postcards, gifts and souvenir ideas

 This has got to be my favourite by far, illustrated and painstakingly collaged by non other but Sarah!
Her work is absolutely amazing

Here's the designer herself. Just so happened we were curating at the same time.
Check out her blog here

 Here's my little corner on the opening night itself. 
My plate and cushion got cropped off the photo but you get the idea. 
They are a range of products that were all printed and made by hand, apart from the framed artwork. 
I love my tea towels :]

There you go. A short tour around our wonderful little exhibition. There's a group photo of us 27 girls as well but I'd post it up once Georgie's given me the go-ahead :)


Friday, 28 October 2011

Folkå


Ta-da! Here's the debut of a small part of my final project on the WWW.

The theme for Folkå revolves around a fictional character of a girl in the shape of Suzannah (illustrated above), who lives in a rural part of Eastern Europe and leads a humble and traditional farming lifestyle. I've produced a range of home and living products including cushions, tea towels, a mug, plate, framed artwork and a tote bag based on this story. It is an entirely illustrated project by yours truly. It wasn't easy but all I can say is the results are pretty cool. All the motifs and artwork on the products paint a picture of her home and way of life :)

We'll be having a graduate exhibition so you could come check out my work and range for this project.

Our exhibition is named twentyseven at Fitzroy Gallery, 274 Fitzroy Street, Fitzroy VIC.

Check out our exhibition website cleverly done by Sarah Strickland. In it will have details of each one of us graduating this year. Sarah's work is illustrative and really beautiful. Definitely worth checking out!

Opening night on 30 November 2011, running through from 1- 5 Dec 2011, Tuesday to Friday: 11am – 5pm Saturday: 12pm – 4pm 

Love to see you there!


Thursday, 27 October 2011

Screen Printing

The past 8-10 weeks have been really intense, to say the least. We had to aim for quality in every single bit of our work. For my latest project, there were both quanlity AND quantity. Have been working on my final project and port folio for at least 8 hours per day, easily reaching 12 hours and beyond in the last month. Stress levels were at its all time high during mid semester but they were managed by lots of planning. 

I plan and write down what I need to do for the day/ week pretty much every day, up to 2-3 times a day. A little excessive really. But it really does make you feel SO good every time you finish and cross each item off. I could have easily crossed off (or rather vigorously inking them till I couldn't even see the words) more than 150 (detailed) items in the past week. Planning has been keeping me on track and helped me work methodically for the past one month or so. 

In this post I just wanted to share a bit of my process. I've been in and out of the printing lab for the past two weeks. It's a place that I love and sometimes hate. I hate it when things don't work my way, especially when certain tedious and time consuming processes had to be repeated just coz something that was out of your control went wrong. That happened quite a few times to me. Felt like screaming coz everyone was running on strict deadlines. 

Another thing I could hate is colour mixing and testing. Testing colours could easily take an entire day. And when all work is finished and the printed fabric was taken to be steamed or heat pressed, the colours might darken/ lighten or worse, turn yellower/ greener etc. That happened to me. But there wasn't time to redo coz it could mean repeating a day or week's worth of work, depending on how many colours went wrong. 

What I do love about screen printing is, despite all that could go wrong which you might have to painfully repeat, the results can be absolutely amazing. Even better than digital printing in some cases. Not to mention the fun part of printing. Love it!!

Seems like this would be my last time ever that I'd be screen printing in my life. I just can't see when or where else I could hand print design work apart from uni and this is already the last week of my course. 

So here are a few shots of me screen printing and what I've been up to. 


 Colour mixing with pigments. A process very much like mixing a cake batter using a spatula.
Colours here look so good and yummy!

 Hosing off the screen after exposing designs with intense UV light, which allows the exposed areas to harden and the unexposed areas to be easily washed off  from screen

 Me holding a squeegee about to print. This shot was from last sem's work but
thought I shouldn't miss out a shot on printing in this post

 My final project! Very folk-inspired ;) About to be made into a cushion

 A tea towel design printed on natural linen

 First time printing my design on decal paper...

...and transferring them onto ceramic!! Fiddly but fun process!

Will show more of my illustrations and finished products of this project, which I've named Folkå :)


Monday, 27 June 2011

Gotta Love Digital Printing

When I was over in Sweden last year, one of the most valuable experiences I had from the exchange was being able to print digitally on fabric. 

This was a student project which allowed the students to have complete freedom and reign over what we wanted to experiment and achieve, as long as it is textile related. Some of my friends tried embroidery and knitting. I chose fashion illustration, something that I first did when I was 14 years old. The entire process was just soooo fun!! I loved every part of it!! Loved researching and reading blogs of illustrators and had much fun just drawing, experimenting and learnt that even a tiny stroke to the eyes or mouth (for example), could greatly alter the facial expression or look to the illustration. 

This project was meant to spread out over a period of 2 months but I had to condense much of the experimenting and designing leading up to the final outcome to just 2 weeks...because I squeezed in half a week of traveling to Spain into it with a friend, which was fun :). The 2 weeks after the trip basically saw me being stuck in my room the entire time, playing and re-playing all my Pixar movies whilst frantically sketching. My friends were so nice to even cook for me during that time! Love them to bits. Too bad we're now all scattered at different parts of the world now :( 

My desk in the midst of design- chaotic


I put together the illustrations into two patterns. Here's the final outcome!


Tedious project with lots of work involved, my design diary for this was thick as. But oh so worth it :)

Thursday, 28 April 2011

Softies for The Johnston Collection

Here's a product board that I did for one of my subjects. This time around, I've decided to not include any existing images from websites but rather illustrate everything myself, which was hard work, but it's one of the boards that I must say I quite enjoyed making.


What made me really excited about this idea is that the softies could be personalised by the kids as they PAINT on the softie! This idea was inspired by the softies that Mirka Mora did back in the 1950s onwards. I thought this idea would be amazing for kids since they'd like painting and this is like an artwork that they could colour in and carry around.

Presentation date has been postponed to next week. Hopefully everything turns out good.


Monday, 25 April 2011

Boys Bedlinen for Dryen

I've been quite busy working on all my final year's assignment. It's been quite interesting so far that our assignments now clients that are actually not made up but do actually exist. Last year when I was away in Sweden, we've had projects with Linen House and Zimmermann. This semester, we have a design project with another major bed linen company again!

We have a choice of choosing between adults and kids range. Realising this year that my strength lies in illustration and recently have developed an interest in character design, I was straightaway attracted to doing kids' range. Since I've done design work for little girls, thought I'd try out for little boys. 

The theme?? Monsssstttterrrssssss rrawwwwwr!!!!

Here's a small screenshot of my work so far. My new Mac Pro is already lagging due to the size of the file. It would have crashed I guess if I did it in Photoshop...


So far, quite pleased with the result though this could be only the basic version of my pattern. Gonna try different backgrounds and fillers so that'll take some time again to do.

Hope you like it! :D

Till I return, I shall be MIA for a while...


Tuesday, 15 February 2011

An Enchantail


Top- Bottom: 
1) Story Board
2) Mood/ Colour Board
3) Print/ Graphics Board
4) Styling Board
  
These are the story and mood boards of one of my print projects, which I named 'An Enchantail'. This range was targeted for newborns to toddlers. Initially wanted to make this a range for little girls but the end result of the screenprinting process produced a rather unisex result, which turned out quite nicely. 


Helen Dardik is unlike any other illustrators that I've ever seen. Her works are so awesome that I found myself kept going back to her work for inspirations. Sanna Annukka from Marimekko had also made her mark in the inspiration of this range. 


Photos that are featured here were entirely acquired from external sources that are not referenced here. 


You can see some of the swatches from my range here :)!

Saturday, 24 July 2010

Geometric Ornament- Part 2

Holiday times can be a great time in catching up in whatever that you've told yourself to do more when you've got the time. To me, one of them is blogging, as I think that it's important to keep the readers entertained and inspired by putting up new and inspirational posts. Keeping posts regular can be a real good reason in keeping them coming back for more. On the other hand, having too much time can be a curse as well coz you'd end up getting lazy. That's the case for me as for now. EEEEK!!! I hate being a slob and being unproductive. Don't get me wrong, I love holidays. But too much time and not doing anything? Bad, bad, bad. 

Here's something that's overdue, haha. My CATD project titled 'The Secret Garden'. Here's a few snippets of my design.

32x32cm Repeat Design
One placement design (Top Left) and 3 options for colourways

Small section on my initial 16x16cm repeat design. However, having to comply with the requirements in the assignment, I decided to go with the design below for my 16x16. Didn't like it as much but too little time on hand to experiment with other potential designs.


Heading of to Camberwell Market tomorrow morning. Hopefully I'd be able to grab some bargains!


Tuesday, 13 July 2010

Geometric Ornament- Part 1

The semester that just ended had us onto our second project for CATD, using Illustrator for most of our work. Titled 'Geometric Ornament', I'm not exactly sure if I actually stuck to the guidelines and main criteria of the project- to create GEOMETRIC patterns. It was a time where we were all rushing, working towards our crazily short deadlines and I'd say 70-75% of this project was done within a period of approximately 3 days, max 4. Lots of work to be done, too little time coz:


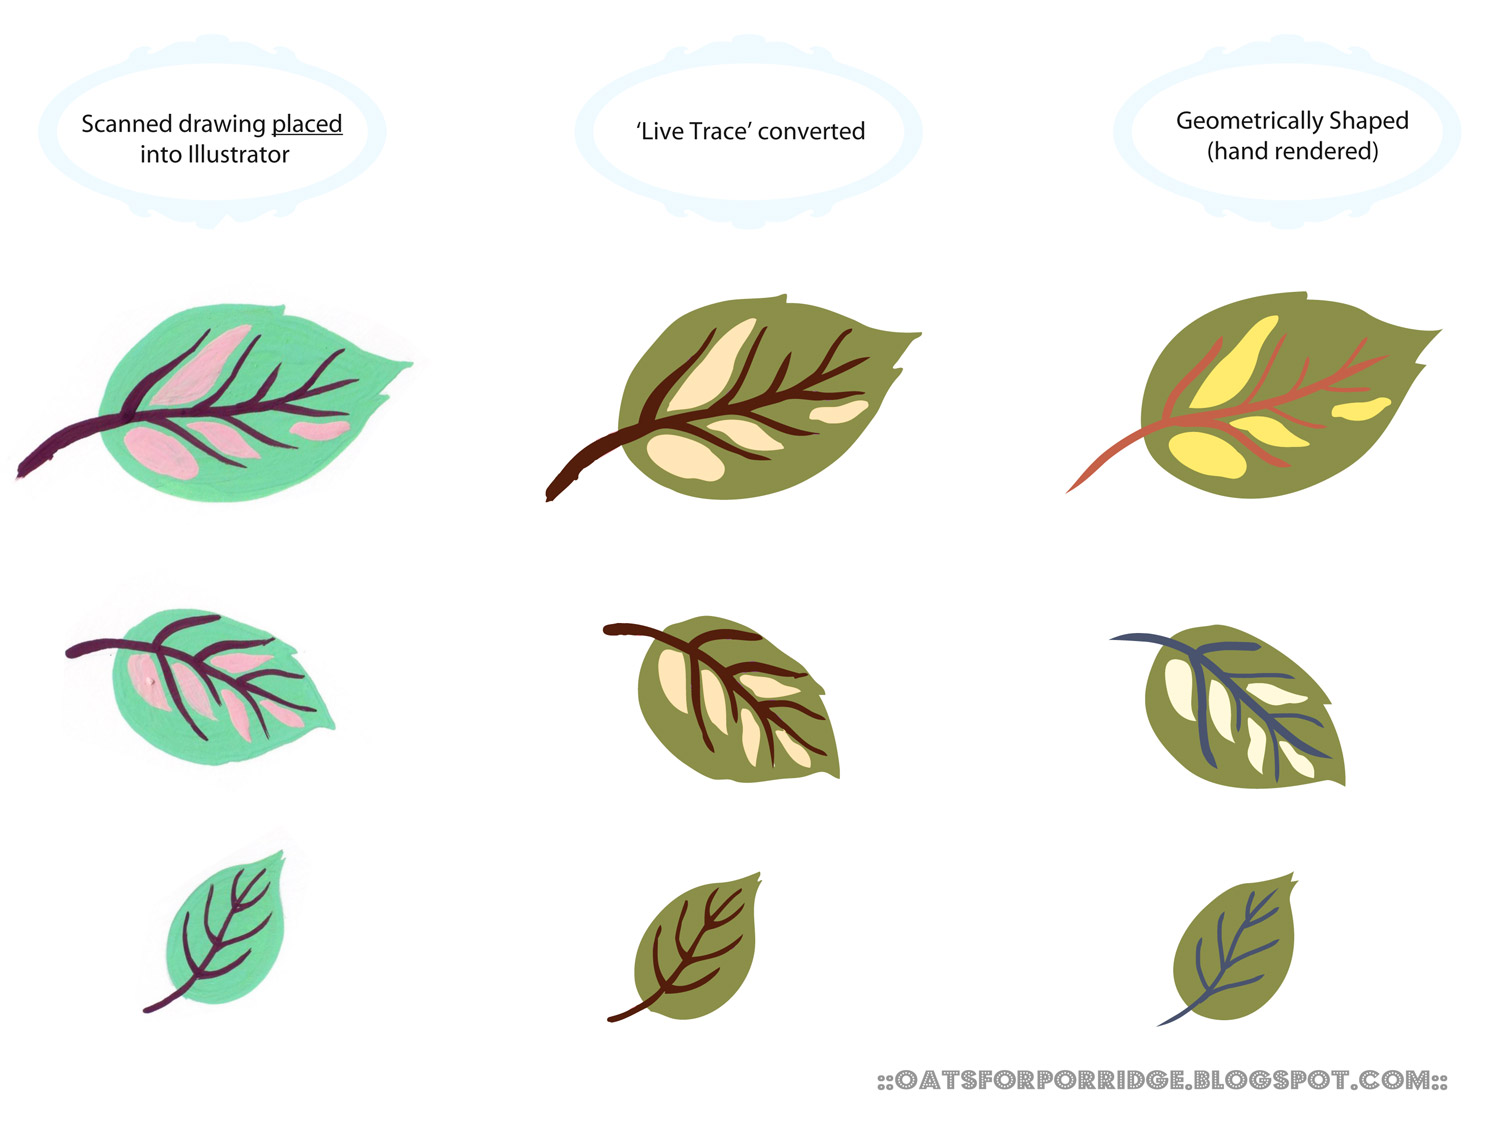
1) Had to hand paint it, as you've probably seen in a previous post here
2) Scan it
3) Tidy bits up on Photoshop. Lots of magic wand, poly lasso tool and eraser using. Press Delete + Delete and Delete.
4) Import to Illustrator
5) Live Trace on Illustrator. Meaning to convert the image into anchor points. Huge, huge file
6) Create alternative to Live Trace, which is to hand render it, which I painstakingly clicked on every blinking anchor points of every blinking motif.


So below, is a wonderfully yet painfully compiled conversion boards I did for the project. 
1st column- Hand painted, scanned & neatened up
2nd column- Live tranced and colour changed
3rd column- Single handedly created every shape by clicking on evert anchor points. Despising yet rewarding...I'd like to think.


Conversion Board 1
Conversion Board 2
Conversion Board 3
Conversion Board 4

So here are the motifs used for the project. 

By the time I got to this stage I had to literally race against time to finish my assignment! Got by with little sleep, hence was totally losing the plot of this project already. More of the final, not every geometric looking outcome in the next post or so coz I've a haircut in an hour haha!

P/S: Motifs here are shared for viewing only. Absolutely no sneakiness (like using this on anyone else's work/ project) allowed. Cool? :)


Wednesday, 16 June 2010

Making of the Baba Nyonya-Inspired Shawl


Hi!! I'm back to blogging now after a month of neglect. Too much to do, too little time.

Here are images I've taken of my shawl, a design project based on our personal interpretation of 'Happiness'. What's my security blanket? What makes me happy? I wanted to make a shawl that was all black/ white with different fabric manipulation like gathering, puff etc.  Looking at them may make me happy. But I thought about my travels back home to M'sia, which I look forward to most of the times, and I remembered how Grandma used to always wear her kebaya. Never had my past projects any cultural references. They've always been inspired by catwalks or contemporary Western art. They definitely had nothing at all that told a story of my background or heritage. So this was the perfect chance to showcase the art of the kebaya from the hybrid culture of the Baba Nyonya! Instead of embroidering the motifs, which I definitely can't do (yet), the scarf was silk-screen printed by myself. Motifs were inspired by typical Chinese motifs of the peonies and butterflies, each with specific meanings behind them.


Corner design


The scarf is to measure at 1m x 1m, making it a square shawl.  However the stretchiness of the fabric made it into a rectangular one! The design process was not that bad. I only had to design a corner and have them repeating and mirroring at the other 3. Hence the challenging part was only to make it as symmetrical and as perfect as possible. Motifs of the flowers and butterflies were all hand-generated, scanned, enlarged, printed, laid on corner design and traced. The in-betweens were filled with leaves, stems and the cut-out webbing so commonly found in kebayas.

Five colours were used: 2 tones of porcelain blue, 2 tones of brown and 1 pink, which I gave fancier names in the resource book. 

Outlines of the motifs were all screen printed and the gradients of colours were filled in by hand. Petal by petal, leaf by leaf. All in all, a super labour-intensive process, from coating and exposing of screen to the painting of the motifs. Not to mention stupid colour testings. This doesn't even include fabric tests, samples produced, steaming, bloopers and....omg, the sewing. Nearly killed me and cost me a few precious tears. It was such a soft and delicate fabric to sew (wool/ viscose blend), which makes it extremely hard to sew to the ribbonned border. 

 Close-up of freshly handpainted butterfly with a brush and handpainting solution

Now, washing out of the shawl was vital to ensure all excess colours are taken out of the printed fabric, before sewing. I nearly got a heart attack when the dark blue kept washing out and I came back to my bucket of Mesitol (this liquid fixes the dye even more) being totally dark blued, when there was only dark blue at the outlines of the motifs!! Fading or washing out was my enemy :( 

 Photo taken before shawl was washed and soaked in Mesitol


Anyhow, boring bits aside, somehow, the shawl did transform into something really beautiful and I've already worn it out once, though the colours faded a fair bit from washing. Had to do a photoshoot for the project so I've asked some help from David. All I could remember was him asking me to roll my shoulders forward, chin lifted, and lips parted, man! We ended up mucking around with the scarf towards the end of the photoshoot, which in turn STAINED my scarf with my lippy. DAVIDDDD!!! Hope it is still washable after I get my scarf back from marking.

Here's the result of the photoshoot :)


Resembling some Indonesian Tai-Tai?? (meaning a lady that lives a pretty well-to-do lifestyle with much financial support from husband)

Here's a shot that may jeopardise my image. An attempt looking like Audrey Hepburn in the 50's with her huge sunnies and sun scarf which failed dramatically. Faux sunnies actually was David's 3D glasses. How glam.

Oh well, in the name of fun and a bit of a laugh, it should be worth it, I hope. :P